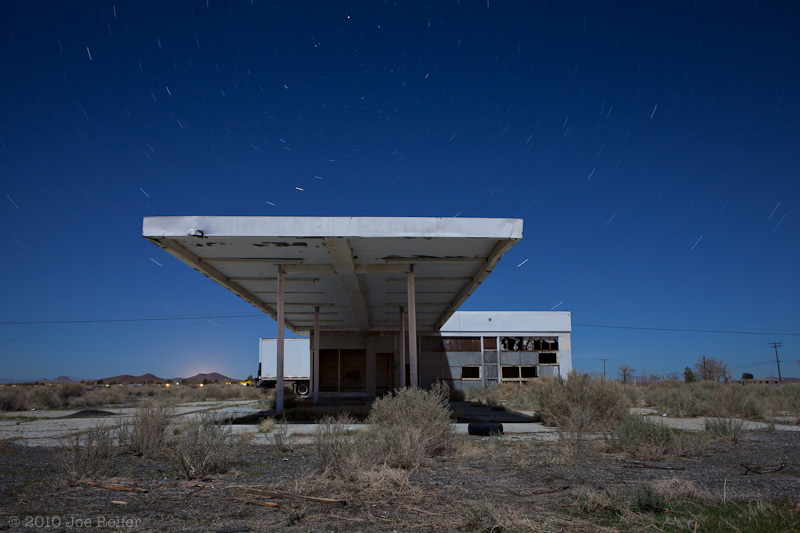
Night photography: Circular star trails at an abandoned desert gas station
When the camera position faces to the north, the stars will spin around Polaris (the North Star) in a long exposure. A commonly asked question at my night photography workshops is: how long of an exposure is necessary to achieve this effect? Budding night photographers are often surprised at how short the star trails are with a northward facing composition, even with what seems like a long digital exposure time in the 10 minute range.
This example image is a 10 minute exposure at f/9.5, ISO 160 with the Canon 5D Mark II at a focal length of 25mm. The exposure is approximately the same as my typical full moon exposure time of 5 minutes at f/8 ISO 200. Because the weather was quite cold, I was able to expose for 10 minutes without using in-camera noise reduction. The star trails near Polaris do not show much movement.The final version of this image is three 10-minute shots stacked together for 30-minute star trails. While it's certainly possible to fill the sky with stars by exposing for hours on end, be careful that you don't overwhelm the subject with a special effect. An exposure in the 30-40 minute range is enough to show the circular star movement, but still leaves enough negative space in the sky to allow some breathing room in the photo. Subject first, stars as the icing on the cake.
Here are a few basic ideas to remember regarding star movement:
- If you're facing north, an exposure of 30 minutes or longer will achieve a nice circular star trail effect when shooting wide angle.
- The farther away from Polaris you get, the longer the star trails are for a given exposure time (i.e., point east, west, or south for longer trails in short exposures).
- If you're facing west, the stars will travel diagonally downward.
- If you're facing east, the stars will go up.
- Pointing the camera to the south yields almost horizontal star trails.
Armed with this knowledge, your digital test exposures will become even more useful. Checking the position of the brightest stars in your test exposures will allow you pre-visualize how the stars will travel across the sky in your photos, and how the star trails will interact with your subject. I hope these tips are helpful on your next night photography adventure. Happy trails!

